As a member of the Etsy affiliate program and an Amazon Associate, I earn from qualifying purchases.
At Casa de Kolchak, we love chilling out on our deck.
In the summer, we like to be out there all day, as much as possible. When you’re chilling out in the sun all day, you need to stay hydrated. Last week, we shared our frozen bowl for dogs, which is out favourite way to keep our water bowl cold, but what about the humans? We’ve got to stay hydrated too. Besides, enjoying a few beverages on the deck with friends is an important part of summer!
I wanted to infuse a little dog love into a fun DIY Serving Tray.
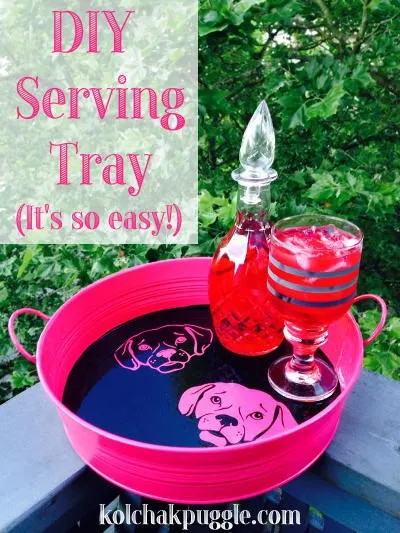
As much as I might want to tease my friends and start serving up Sangria in these ridiculously awesome glasses, they’re probably a little over the top for me. I’m all about the subtle touches that show I’m a dog lover, without letting the whole house go to the dogs.
A few weeks ago, I ordered a bunch of decals from the Stylish Canine and I didn’t really have a plan for what I was going to do with them. When you have a mixed breed or a rare breed, anytime you find something like puggle vinyl decals, you jump on it because you never find puggle stuff!

Vinyl decals make it so easy to block off an area and paint around it. It requires almost no crafty skills. Just peel and stick the vinyl decal, slap on some paint and away you go. Do you want to try it?
Here’s What You Need:
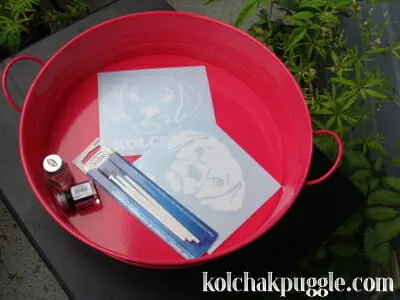
Vinyl Decal in your chosen design
Paint & Paint Brush
(Make sure you choose a paint compatible with the type of tray you bought. I used enamel paint on my metal tray, acrylics on wood trays and paint designed it for plastic. I’ve had a lot of success with these paints on all types of surfaces. <–affiliate link)
Klean Strip Liquid Deglosser (<–affiliate link) & a lint free cloth
Shellac or clear coat
Let’s Do this:
1. Prep Your Tray –
I started with a painted metal tray. So this step was super easy for me.
If you started with unfinished wood tray, give it a quick sand and a layer or two of paint all over. Allow to thoroughly dry.
Apply your vinyl decal to your tray, taking care to go slowly and get a flat, clean application. Use the edge of a credit care to smooth out any bubbles. (If you rush this step, you just might regret it later – I sure do!)
Once your decal is applied, use a soft cloth to rub the rest of the surface with liquid deglosser. (Don’t over think this step. A quick wipe is really all it needs!) Allow the deglosser to completely dry.
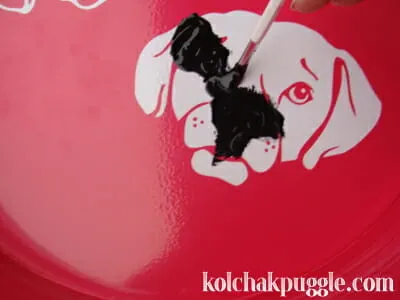
2. Paint Your Tray –
3. Remove the Decal –
Carefully peel up your decal. Go slowly and take care not to rush it or you risk damaging the paint. (If you need help lifting the edge of the decal to get it started, I found a stick pin like the ones used for sewing to be the perfect way to gently lift the vinyl without getting fingerprints in the paint.) Once all parts of the decal have been peeled off, allow the paint to fully dry.
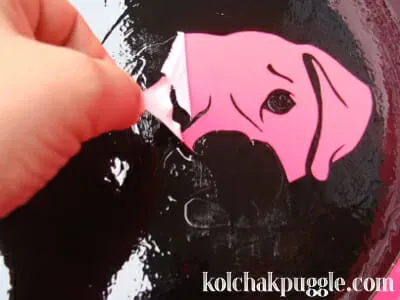
4. Seal the tray –
Once your paint layer is completely dry, add a clear coat to the entire tray surface to protect it. Allow this clear coat to completely dry before you use the tray.
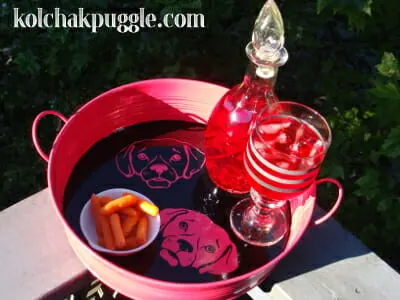
That’s it! 4 Simple Steps to make a painted serving tray for yourself or the dog lover in your life.
You can even make your tray super personalized. Stylish Canine can make a decal modelled after your own dog! Does that puggle decal look an awful lot like any puggley you know? Eh? EH?? Or check this one out:

We loved this easy, quick fun little DIY Serving Tray Project.
These trays make a great gift for the dog lover in your life, a fun project to work on with the kids and a fabulous way to add a touch of pup love to any dog friendly deck.
Kol’s Note: This post was not paid for, sponsored or commission by Stylish Canine. I purchased all of the materials, including the decals. All opinions and endorsements shared reflect my 100% honest opinion.


Weekly Roundup of Cool Dog Ideas - Smart Dog University
Tuesday 15th of May 2018
[…] DIY Serving Tray for Dog Lovers — from Jodi Chick […]
Easy, Dog Silhouette Art (That You can Update With the Seasons) - Kol's Notes
Sunday 28th of September 2014
[…] few months back, I made a custom painted serving tray featuring none other than my Kolchak, using Stylish Canine vinyl decals as my stencil. I’m a […]
Choosing the Perfect Outdoor Dog Bed | Kol's Notes
Thursday 31st of July 2014
[…] […]
Maggie
Wednesday 2nd of July 2014
I seriously love this. Like, LOVE. Pinning and making as soon as we get to IN. LOVE.
Laurie Luck
Monday 30th of June 2014
I gotta share this! Too cool!